



How to Make Blackout Roller Shades in 7 Easy Steps
You can make blackout roller shades by cutting suitable blackout fabric to size, attaching it squarely to a roller tube, and installing the mechanism at the window. For homeowners who want stronger bedroom darkness or privacy with a DIY solution, accurate sizing and fabric alignment matter most. The project is straightforward when the fabric and roller hardware are compatible. A well-built shade should stay flat, roll evenly, and cover the planned window area without rubbing the frame.
What Do You Need to Make Blackout Roller Shades?
A DIY blackout roller shade uses relatively few parts, so each material directly affects the finished result. The fabric determines light control, while the roller mechanism determines how the panel moves. Check compatibility before cutting because fabric thickness and finished weight can affect the roller.
Choose Blackout Fabric for Light Control
Blackout fabric should prevent visible light from passing through the covered part of the window. Light-colored fabric can provide strong light blocking when its construction is designed for blackout use, so check the material specification instead of judging it by color or thickness. Blackout fabric also provides stronger nighttime privacy than translucent material.
Choose a Compatible Roller System
The roller tube and mechanism must support the finished width and weight of the fabric. Check the hardware instructions before adding a separate liner because another layer increases both roll thickness and load.
A cordless spring roller is practical for a basic manual shade. Wider shades or windows that are adjusted frequently may be easier to operate with a powered system. Bringnox Motorized Roller Shades 100% Blackout Linen combine custom sizing with 100% blackout fabric and cordless operation. Its motor noise is below 45 dB, while the rechargeable battery is rated for about four to six months of daily use per charge.

Prepare the Tools and Materials
Work on a clean, flat surface large enough to support the fabric without folding it. Use only the attachment method approved for the fabric and roller kit. If adhesive is required, test it on scrap material first and follow its ventilation and curing instructions.
|
Item |
Main Function |
|
Roller kit |
Raises and lowers the roller shades |
|
Steel tape measure |
Measures the opening and fabric |
|
Straightedge |
Guides straight cuts |
|
Rotary cutter or scissors |
Cuts the material |
|
Approved adhesive or tape |
Attaches fabric to the tube |
|
Bottom bar |
Stabilizes the lower edge |
|
Level |
Aligns the brackets |
How to Make Blackout Roller Shades in 7 Steps
Build the shade in the same order it will function at the window. Measure first, prepare the fabric next, and install the brackets only after the panel is properly attached to the tube. This makes sizing and tracking problems easier to correct before final installation.
Step 1: Measure the Window and Choose the Mount
Choose an inside or outside mount before measuring the window. Inside-mounted shades sit within the window recess, while outside-mounted shades cover the opening and allow more overlap around its perimeter.
Measure the width at the top, middle, and bottom and the height on the left, center, and right. For an inside mount, check the usable depth near the top of the frame. For an outside mount, measure the complete area the lowered fabric needs to cover.
Step 2: Mark and Cut the Blackout Fabric
Lay the fabric flat and allow tightly rolled material to relax before marking it. Mark the required width near both ends of the panel. Place a long straightedge between the marks and draw the cut line.
Measure the finished length next. Check the corners with a square if one is available, then cut along the lines with a rotary cutter or sharp scissors.
Keep the material flat while cutting and avoid pulling it toward you. Stretching one side can distort the edge and make the panel harder to align with the roller.
Step 3: Finish the Fabric Edges
Check the fabric manufacturer's instructions before adding a hem or edge treatment. Some roller fabrics are designed for a clean-cut edge, while woven materials may require a compatible finish to control fraying.
For woven fabric that begins to fray, apply a narrow strip of fabric-safe fray sealant along the cut edge. Let it dry completely before rolling the blackout roller shades.
You can also make a narrow bonded hem when the fabric is thin enough. Fold about 1/4 inch of the edge toward the back, place fusible hem tape or fabric adhesive inside the fold, and press it flat according to the product instructions.
Keep any finished edge thin and consistent from top to bottom. A thicker edge can build up unevenly as the material wraps around the tube.
Step 4: Attach the Fabric to the Roller Tube
Place the roller tube on a flat surface and locate the attachment line specified by the roller kit. If the tube does not provide one, mark a straight reference line across it.
Center the fabric beneath the tube and check its position at both ends. Secure the center of the top edge first using the attachment method provided with the kit. Work outward from the center without stretching the panel.
Rotate the tube slowly for one complete turn. Watch both fabric edges as they wrap around it. If one side begins moving outward, unroll the panel and correct the attachment angle before continuing.
Step 5: Install the Bottom Bar
Center it so the ends remain inside the fabric edges and do not strike the frame during operation. For a pocket-style panel, slide the bar fully into the lower pocket and smooth the fabric. If the system uses a clamping rail, align the bottom edge before securing the rail.

Step 6: Install the Roller Brackets
Mark the first bracket position at the planned mounting height. Transfer that height to the opposite side and use a level to confirm the two marks before drilling. Attach the brackets with fasteners suitable for the mounting surface. Follow the roller kit spacing requirements so the tube can lock into place and rotate freely.
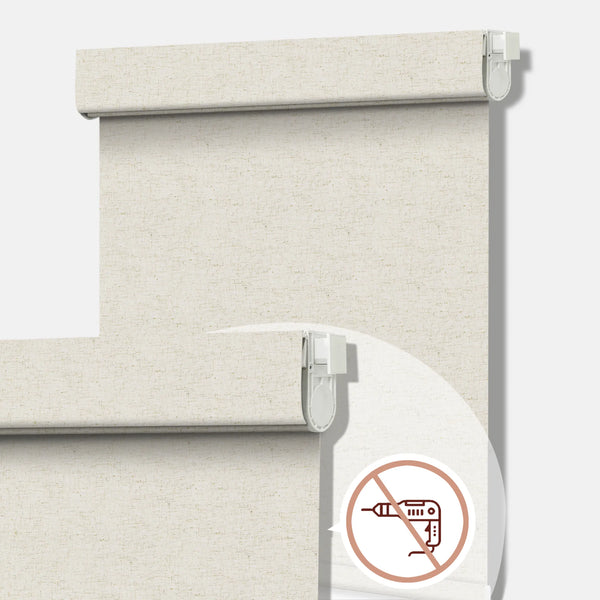
When drilling into the window frame is not practical, Bringnox No Drill Motorized Roller Shades 100% Blackout Linen use an inside-mount system designed to secure without power tools or wall holes. The cordless motorized design removes the need for a manual pull cord while preserving blackout coverage.
Step 7: Test the Shade and Correct Tracking
Place the roller into the brackets and lower the shade halfway. Check whether the bottom bar remains level and the fabric stays centered.
Raise and lower the shade through several complete cycles. If the fabric consistently moves toward one side, check the bracket level first. If the brackets are level, inspect how the fabric meets the roller tube. Reposition a panel that starts at an angle rather than trimming the side edge.
Lower the shade fully for the final check. Light around the perimeter usually comes from installation gaps, while light visible through the center of the material points to the fabric itself.
How Can You Make DIY Blackout Roller Shades Safer?
Safety depends on the operating mechanism as well as correct installation. A homemade fabric panel should still use hardware designed for window coverings rather than an improvised lifting system.
Use Cordless Roller Hardware
Cordless hardware is the safer choice when children can access the window. The U.S. Consumer Product Safety Commission states that cordless window coverings eliminate the strangulation hazard created by accessible operating cords.
Avoid reusing an old, loose pull cord. Use a manufactured cordless roller mechanism and install it according to its instructions.
Check Adhesive and Room Conditions
Follow the fabric and adhesive instructions near sunny glass or other heat sources. For humid rooms, use materials intended for moisture exposure. Wipeable blackout fabric is easier to maintain near sinks or other areas where splashes are possible.

FAQs
Why Do DIY Blackout Roller Shades Leak Light?
Light usually enters around the shade edges. Blackout describes light control through the fabric, while the mount affects perimeter gaps. Additional outside-mount overlap can reduce visible edge light.
Which Side of Blackout Fabric Should Face the Window?
Follow the fabric specification. Some materials have a distinct coated backing, while others are finished on both sides. Do not determine orientation from color alone.
Can Blackout Roller Shades Reduce Window Heat?
Yes, to some extent. Closed interior shades can reduce unwanted solar heat gain, according to the U.S. Department of Energy. The actual effect depends on the fabric, window, fit, and sun exposure.
Can You Wash Blackout Roller Shade Fabric?
Usually avoid machine washing unless the manufacturer permits it. Coatings can be damaged by soaking or agitation.
Conclusion
Making blackout roller shades successfully depends on choosing suitable blackout fabric, measuring the window accurately, and keeping the fabric square as it is attached to the roller. Use compatible cordless hardware and test the finished shade through several full cycles before regular use. Careful sizing and installation will help the shade roll smoothly, provide reliable privacy, and reduce unwanted light around the window.